Platform implementation
The platform, based on Potree native functions and proposed modifications of the Vizcaya museum project, aims to simplify the exploration of a 3D digital model of a cultural heritage site. With this goal, the implementation focused on the definition of simple and easy-to-reproduce functionalities that could guide even non-experienced users through the inspected and reconstructed structure. This has been achieved using a combination of:
Annotation actions triggered by the user click on a given hotspot inside the 3D scene;
Camera animations that allow to explore a given scene using a pre-defined navigation path;
Pop-up windows that make possible to see in more detailes images or to include text contents;
Shortcut buttons used to simplify into a single command more operations.
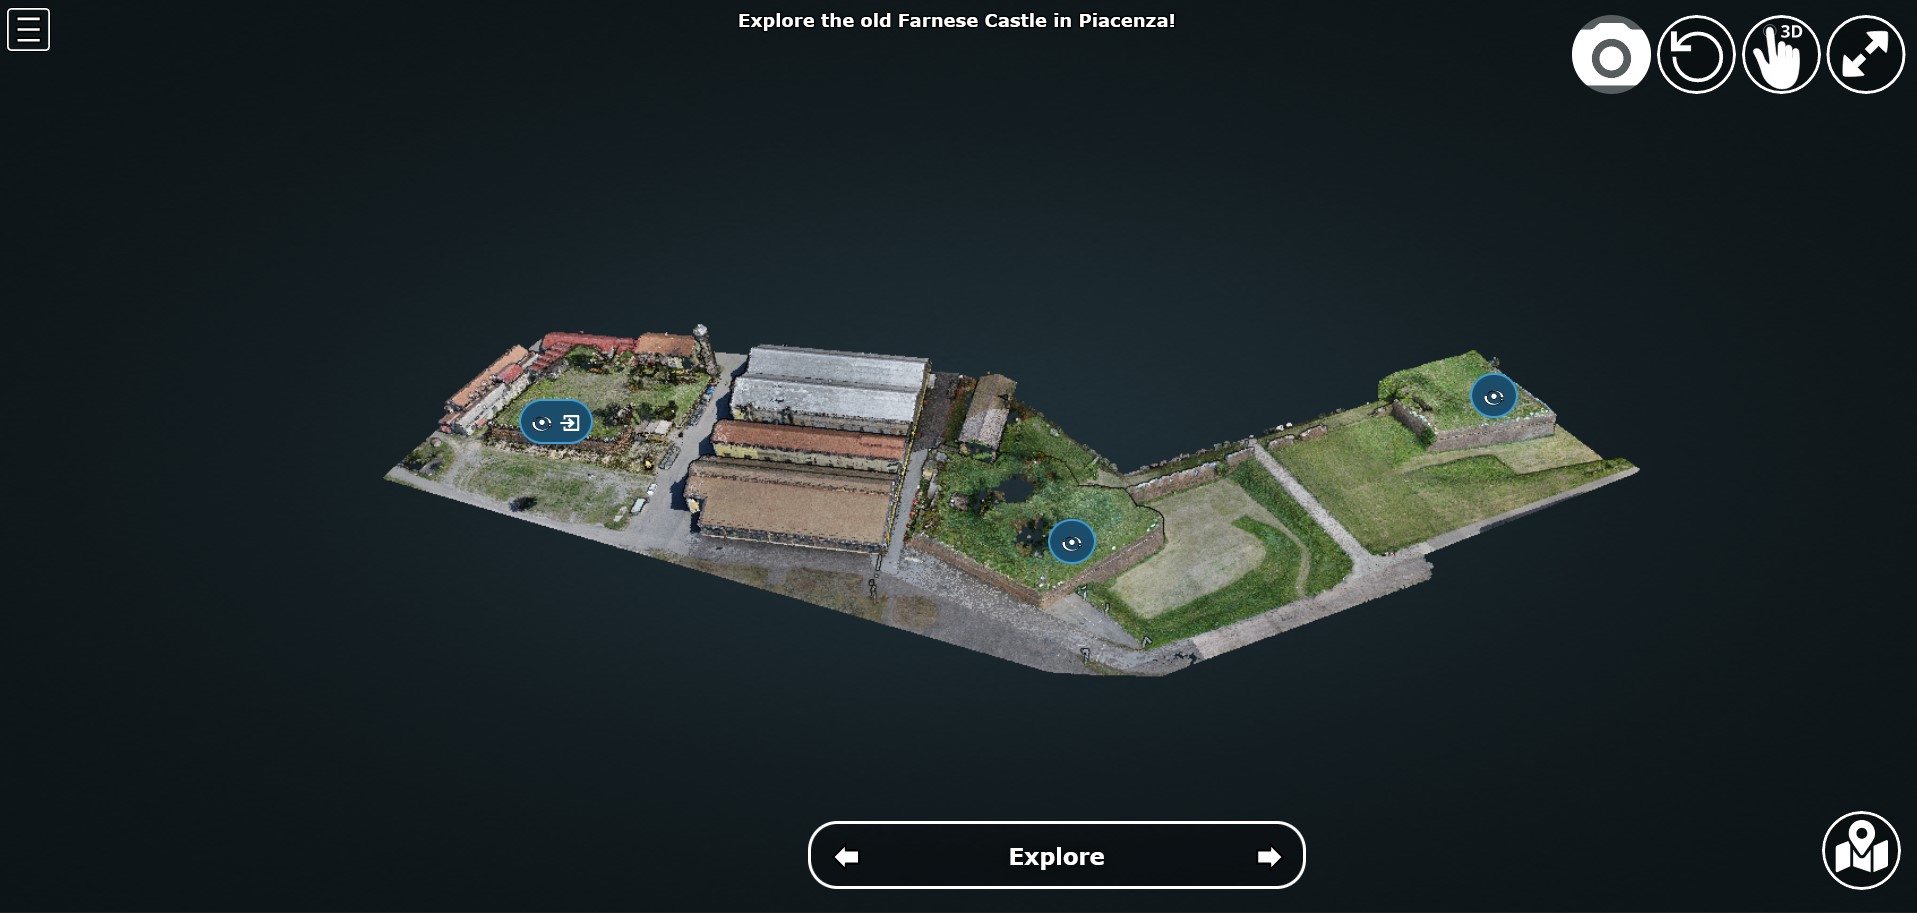
The work has been articulated on 2 different perspectives, dividing the entire model into 2 scenes:
Outdoor scene referring to the outside of the 3 surveyed bastions of the castle, for which drones were adopted in addition to total station and GNSS antennas;
Indoor scene of the only bastion (San Giacomo one) which was accessible at the moment of the survey and that was subject to a laser scanner survey.
Data preparation and loading
The platform includes different formats and types of 3D objects and entities: * Point clouds, discrete sets of data points in space representing the 3D shape of the castle. They are the results of the combined photogrammetric and laser scanning survey of the site. The need to be converted from .las/.lax to a .json format with the PotreeConverter in order to be used in the viewer. * Meshes, the structural build of a 3D model consisting of polygons. The projects include one mesh for each documentes historical construction step. * Annotations, a set of descriptive labels georeferenced in the 3D space. They have a unique title and different descriptions that includes multimedia or actions for moving within the scene. * Images, their orientation parameters and camera calibration options, photos taken during the field survey of the site and used in the photogrammetric reconstruction of the castle, obtaining their coordinated and orientation on the same reference system of the point clouds. * Animations, ordered sequences of camera viewpoints that when interpolated results in a virtual first-person tour in the viewer.
All the JavaScript scripts for loading the different file formats are included on the GitHub repository on the dedicated JS folder.
Control icons
Due to their peculiarities inherited by survey methods and instrumentation too, the 2 scenes require the implementation of 2 distinct groups of navigation solutions to better fit their needs. However, some useful common functionalities have been mantained for both scenes. In particular, the main structure of the viewer has been designed to always mantain visible 4 commands:
Castle evolution (castle_phases) button associated to the dynamic paragraph (castle_phase_text) containg the description of the shown phase;
Oriented images (camera_icon) visibility control;
Refresh page (refresh_icon) option;
Navigation instructions (question_icon) command;
Full screen view (fullscreen_icon) button.

All these buttons, positioned on the upper right position of the screen and thought as shortcuts for common operations.
Their style and appearances have been defined as the following example in the assets/css/style.css file:
#refresh_icon {
  /*display: none;*/
  width: 80%;
  height: 80%;
  position: fixed;
  top: 15px;
  right: 160px;
  /*130px*/
  cursor: pointer;
  max-height: 70px !important;
  max-width: 70px !important;
  z-index: 2;
  background: rgba(0, 0, 0, 0.3);
  border-radius: 35px;
}
Then, the control icons (and their image logos) have been included in the body section of the index.html file as follow, linking each button to a specific custom function triggered by the user click:
...
<!--Control Icons-->
<img id="camera_icon" onclick="" src="./assets/camera.svg" title="Activate Images" />
<img id="refresh_icon" onclick="refreshButton()" src="./assets/refresh.svg" title="Refresh Page" />
<img id="question_icon" onclick="" src="./assets/question.svg" title="Tutorial" />
<img id="fullscreen_icon" onclick="toggleFullScreen()" src="./assets/fullscreen.svg" title="Fullscreen" />
<img id="castle_phases" onclick="" src="./assets/back-to-the-future.svg" title="Castle phases"> </button>
<p id="castle_phase_text">Current state</p>
...
Then, each function has been defined.
Castle phases evolution
This shortcut has been inserted in the main homepage for guiding easily non expert users in switching the 3D outdoor views between consequent historical reconstruction.
...
let visiblePhase = -1;
let phases = ['fase1', 'fase2', 'fase3', 'fase4', 'fase5', 'fase6', 'fase7', 'fase8', 'fase9']
let phases_text = ['Before 1547', 'September 1547', 'November 1547', 'Winter 1547-1548', 'January 1550', 'June 1550', 'August 1550', 'October 1551', 'May 1553']
function changeVisible(modelNumber) {
  if (modelNumber==-1) {
    viewer.scene.pointclouds[0].visible = true;
    viewer.scene.pointclouds[1].visible = true;
    document.getElementById("castle_phase_text").textContent= "Current state";
  } else {
    viewer.scene.pointclouds[0].visible = false;
    viewer.scene.pointclouds[1].visible = false;
    viewer.scene.scene.children.find(element => element.name == phases[modelNumber]).visible = true;
    document.getElementById("castle_phase_text").textContent= phases_text[modelNumber];
  }
  for (let i in phases) {
    if (i != modelNumber) {
      //hide specific model i
      viewer.scene.scene.children.find(element => element.name == phases[i]).visible = false;
      console.log("Elemento nascosto: " + phases[i])
    }
  }
}

let castlePhasesButton = document.getElementById("castle_phases");
castlePhasesButton.onclick = () => {
  visiblePhase += 1;
  if (visiblePhase >= phases.length) {
    visiblePhase = -1;
  }
  changeVisible(visiblePhase);
};

...
Oriented images visibility
This button is needed to have a easy-to-use shortcut for hiding or making visible all the loaded oriented images on the model. By default, as understandable by checking the assets/js/loadphotos.js file, all the images are hidden to have a cleaner view of the model at first loading. However, the click on the camera icon make them visible by triggering the following function included at the end of the index.html that switch the visibility conditions of all the loaded images chunks:
$("#camera_icon").click(function () {
  console.log('Hai cliccato sulla camera');
  viewer.scene.orientedImages[0].visible = !viewer.scene.orientedImages[0].visible;
  viewer.scene.orientedImages[1].visible = !viewer.scene.orientedImages[1].visible;
  viewer.scene.orientedImages[2].visible = !viewer.scene.orientedImages[2].visible;
});
Refresh page
This icon is simply linked to the refreshButton() function included in the assets/js/main.js:
function refreshButton() {
  window.top.location.reload();
}
Fullscreen mode
In this case, the function has been defined in the assets/js/main.js file. It is based on a series of conditions that check if the current view of the platform is already fullscreen and, based on that information, define if the click on the button will exit or enter the fullscreen mode for the user.
function toggleFullScreen() {
  if ((document.fullScreenElement && document.fullScreenElement !== null) ||
      (!document.mozFullScreen && !document.webkitIsFullScreen)) {
      if (document.documentElement.requestFullScreen) {
          document.documentElement.requestFullScreen();
      } else if (document.documentElement.mozRequestFullScreen) {
          document.documentElement.mozRequestFullScreen();
      } else if (document.documentElement.webkitRequestFullScreen) {
          document.documentElement.webkitRequestFullScreen(Element.ALLOW_KEYBOARD_INPUT);
      }
  } else {
      if (document.cancelFullScreen) {
          document.cancelFullScreen();
      } else if (document.mozCancelFullScreen) {
          document.mozCancelFullScreen();
      } else if (document.webkitCancelFullScreen) {
          document.webkitCancelFullScreen();
      }
  }
}
Outdoor navigation
A set of dedicated actions and features has been designed for the outdoor navigation of the model.
In particular, the following features were implemented:
Hotspot views
Moving to indoor scene
Showing image slide-show
Hotspot views
To facilitate the movements between different positions, a control bar is implemented at the bottom of the Potree basic viewer. This element will help moving between predefined camera view linked to specific point of interests located around the point cloud. This could be particularly helpful when the user is getting lost or confused during the exploration of the 3D product and would like to move to a more guided and familiar point of view using fixed positions associated to specific annotations.
The visible hotspot control bar is made possible by a combination of edits to the index.html and assets/css/style.css files.
In particular, first in index.html the following code is defined for creating the needed elements and blocks:
...
<!--Hotspots Dropup-->
<div class="controls">
  <div class="hotspot-controls">
    <div id="prev" data-title="Previous Annotation" data-action="prev-annotation">
      <div id="prevDiv"><img id="prevIcon" src="libs/potree/resources/icons/arrow_left.svg" /></div>
    </div>
    <div id="hotspots" class="hotspot-name" data-action="toggle-annotation-list"><b id="hotspotName">Explore</b></div>
    <div id="next" data-title="Next Annotation" data-action="next-annotation">
      <div id="nextDiv"><img id="nextIcon" src="libs/potree/resources/icons/arrow_right.svg" /></div>
    </div>
    <div id="lists" class="list hotspots-list visible">
      <ul class="js-scrollable">
        <li id="li1" class="link"><a data-hotspot-target="0" title="Bastione San Giovanni">Bastione San Giovanni</a></li>
        <li id="li2" class="link"><a data-hotspot-target="1" title="Bastione San Benedetto">Bastione San Benedetto</a></li>
        <li id="li3" class="link"><a data-hotspot-target="2" title="Bastione San Giacomo">Bastione San Giacomo</a></li>
        <li id="li4" class="link"><a data-hotspot-target="3" title="Bastione San Giacomo (Indoor)">Bastione San Giacomo (Indoor)</a></li>
      </ul>
    </div>
  </div>
</div>
...
This code snippet define the hotspot controls container and the 3 controls inside it:
The Label of the annotation linked to the chosen view. At first page loading, this is set to Explore. Here, clicking on the text, it will be possible to select a specific hotspot view from a list.
The button to move to the previous view in the hotspot list. A left arrow icon is associated to it.
The button to move to the following view in the hotspot list. A right arrow icon is associated to it.

Then, the complete list of the available hotspots is defined using an unordered list block and associating specific target numbers to each hotspot target and name.
The CSS code referring to the appearance of these elements can be found from line 295 to line 541 in style.css.
Then the functionalities linked to the hotspot controls are defined in a module block at the bottom of index.html
First, variables are defined in order to store in one of it the target number associated to the hotspot selected from the hotspot list.
var src = document.referrer;
var srcSplit = src.split("?");
var hotSpot = parseFloat(srcSplit[1]); //0 for San Giovanni, 1 for San Benedetto, 2 for San Giacomo, 3 for Indoor
Then, a series of conditions are checked and, when the corrispondence between the clicked hotspot target number with the compared value is found, the moveHere function is applied to the scene, changing the view to the annotation corresponding to the clicked hotspot.
For example, for the case of Bastione San Giovanni hotspot:
...
// San Giovanni hotspot has target equal to 0 and it's the second annotation defined.
if (hotSpot == 0) {
          setTimeout(function () {
              scenears.annotations.children[1].moveHere(scenears.camera);
          }, 1500);
      }
...
The changing of visibility of the list, appearing when clicking on Explore is insted defined with the following code:
...
/* Hotspots Control Dropup*/
      $("#hotspots").click(function () {
          $("#lists").toggle();

      });
...
Then a targeted function called changeHotspotName() is defined in the assets/js/main.js file. Its goal is to change the Explore text in the control bar with the name of the clicked hotspot.
//Function to change Touch to HotspotName
function changeHotspotName(newName){
document.getElementById('hotspotName').innerHTML = newName;
}
This function is then used inside the item function series, one for each listed hotspot. Indeed, this function will change the visible text along with changing the camera view and the visibility of linked annotations. For instance:
function item1() {
  changeHotspotName("San Giovanni");
  scenears.annotations.children[1].moveHere(scenears.camera);
  scenears.annotations.children[0].visible = true;
  scenears.annotations.children[1].visible = true;
  scenears.annotations.children[2].visible = true;
  scenears.annotations.children[3].visible = false;
  scenears.annotations.children[4].visible = false;
  scenears.annotations.children[5].visible = false;
  scenears.annotations.children[6].visible = false;
  scenears.annotations.children[7].visible = false;
  scenears.annotations.children[8].visible = false;
  scenears.annotations.children[9].visible = false;
  scenears.annotations.children[10].visible = false;
  scenears.annotations.children[11].visible = false;
  scenears.annotations.children[12].visible = false;
  scenears.annotations.children[13].visible = false;
  scenears.annotations.children[14].visible = false;
  scenears.annotations.children[15].visible = false;
  scenears.annotations.children[16].visible = false;
  }
Each item function is triggered by the click of the user on the associated element in the hotspot list.
$("#li1").click(function () {
  item1();
});
$("#li2").click(function () {
  item2();
});
$("#li3").click(function () {
  item3();
});
$("#li4").click(function () {
  item4();
});
—
Then, in order to enable the possibility to move between consecutive scenes it is needed to define a function list to move within using its index. Its length (corresponding to the total number of defined hotspots) is then saved in a constant.
const functions = [];
functions.push(item1);
functions.push(item2);
functions.push(item3);
functions.push(item4);

const length = functions.length;
Hence, the .getNextIdx() function is defined and built upon the chosen condition defined by the id of the clicked button: next for the right arrow, prev for the left arrow. This function will return the next/previous id of the new scene in the hotspot list, calculating it with respect to the current hotspot view.
const getNextIdx = (idx = 0, length, direction) => {
  switch (direction) {
    case 'next': return (idx + 1) % length;
    case 'prev': return (idx == 0) && length - 1 || idx - 1;
    default: return idx;
  }
}
This function is then finally adopted for implenting the .getNewScene() function that is the one that is actually trigger when the user clicks on the arrows icons.
let idx; // idx is undefined, so getNewScene will take 0 as default
const getNewScene = (direction) => {
  idx = getNextIdx(idx, length, direction);
  var sceneFunction = functions[idx];
  return sceneFunction();
}

$("#prev").click(function () {
  getNewScene('prev');
});

$("#next").click(function () {
  getNewScene('next');
});
Moving to indoor scene
In the outdoor view, annotation actions are implemented on specific locations. In particular, an action for moving to the indoor environment of Bastione San Giacomo is implemented on the related annotation on the outside.
This feature is made possible through simple addition to the loadannotations.js code. In correspondance of the title (es. Titolo) definition, an arrow icon is inserted and named action_set_scene.
Then, through the .find() function, it is defined that, when the arrow icon is clicked, a series of operations should be executed:
The name in the hotspot bar positioned on the bottom of the viewer is changed to Indoor View using the changeHotspotName function defined in index.html.
The view is changed to the camera settings of the 4th annotation defined in the scene (in this example is the one at the entrance of the bastion) by applying the .moveHere function.
The visibility of all the annotations is changed according to the needs of the developer.
{
  // Bastione San Giacomo
  let Titolo = $(`
  <span>
  <img src="./libs/potree/resources/icons/orbit_controls.svg" name="action_set_name" class="annotation-action-icon" /><!---Bastione San Giacomo---><img src="./libs/potree/resources/icons/goto.svg" name="action_set_scene" class="annotation-action-icon" style="filter: invert(1);"/></span>`);
  Titolo.find("img[name=action_set_name]").click((event) => {changeHotspotName("San Giacomo");});
  Titolo.find("img[name=action_set_scene]").click((event) => {event.stopPropagation();
      changeHotspotName("Indoor View");
      scenears.annotations.children[3].moveHere(scenears.camera);
      scenears.annotations.children[0].visible = false;
      scenears.annotations.children[1].visible = false;
      scenears.annotations.children[2].visible = false;
      scenears.annotations.children[3].visible = true;
      scenears.annotations.children[4].visible = true;
      scenears.annotations.children[5].visible = true;
      scenears.annotations.children[6].visible = true;
      scenears.annotations.children[7].visible = true;
      scenears.annotations.children[8].visible = false;
      scenears.annotations.children[9].visible = false;
      scenears.annotations.children[10].visible = false;
      scenears.annotations.children[11].visible = false;
      scenears.annotations.children[12].visible = false;
      scenears.annotations.children[13].visible = false;
      scenears.annotations.children[14].visible = false;
      scenears.annotations.children[15].visible = true;
      scenears.annotations.children[16].visible = true;
  });

  Titolo.toString = () => "San Giacomo";

  let nota3 = new Potree.Annotation({
      position: [553430.471, 4988914.868, 103.226],
      title: Titolo,
      cameraPosition: [553333.7713011784, 4988883.975343259, 166.10804103291153,],
      cameraTarget: [553430.471, 4988914.868, 103.226],
      description: '<b>San Giacomo Bastion</b><br>----<br>Differently from the twin San Giovanni bastion, it has been affected by additional military intervention. Indeed, on the upper part merlons have been added while an underground shelter, adopted as bomb shelter during World War, is still present and partially accessible through a lateral external access.<br>The indoor space is visitable.'
  });

  nota3.visible = true;
  scenears.annotations.add(nota3);
}
Showing image slide-show
For the particular case of the San Giovanni bastion, a special action has been linked to its hotspot annotation. The reason was that the indoor part of the structure was not accessible for a laser scanning survey, so only few images were taken without georeferencing nor orientation on the 3D model. Embedding the possibility to swipe between selected picture using basic slideshow controls.
The main idea behind this features is strictly connected to the panel appearance used for both the navigation tutorial and the image pop-up. Indeed, in order to make the slide-show appearing, a similar element (navPanel class used also for simple image annotations) is defined in the index.html file. However, this time it contains a slideshow-container which in turn incorporates as many myslides fade as there are images you want to include with position text, relative file and caption. Then, at the end of the definition of the set of slides to be shown in sequence the controls (next image, previous image and close slideshow) are defined using hyperlink tags and custom functions to be defined in the code. Finally, the position indicators for the slideshow are located below the slideshow container and associated to the currentSlide function.
<!--Slideshow bastione San Giovanni-->
<div id="anno10" class="navPanel w3-center w3-animate-opacity">
  <div class="slideshow-container">
    <div class="mySlides fade">
      <!--Defining the number of the image-->
      <div class="numbertext">1 / 3</div>
      <div class="photo-slide">
        <img src="./assets/anno-img/sangiovanni01.jpg" style="display: inline-block; width:70%; border-radius: 15px; margin: auto;">
      </div>
      <div class="text">Indoor entrance</div>
    </div>
    <div class="mySlides fade">
      <div class="numbertext">2 / 3</div>
      <div class="photo-slide">
        <img src="./assets/anno-img/sangiovanni02.jpg" style="width:70%; border-radius: 15px; margin: auto;">
      </div>
      <div class="text">Indoor right wing</div>
    </div>
    <div class="mySlides fade">
      <div class="numbertext">3 / 3</div>
      <div class="photo-slide">
        <img src="./assets/anno-img/sangiovanni03.jpg" style="width:70%; border-radius: 15px; margin: auto;">
      </div>
      <div class="text">Indoor casamatta</div>
    </div>
    <!--Slideshow controls-->
    <a class="prev" onclick="plusSlides(-1)">❮</a>
    <a class="next" onclick="plusSlides(1)">❯</a>
    <a class="closing" onclick="closeSlides()"><b>X</b></a>
  </div>
  <br>
  <!--Indication of current image-->
  <div style="text-align:center">
    <span class="dot" onclick="currentSlide(1)"></span>
    <span class="dot" onclick="currentSlide(2)"></span>
    <span class="dot" onclick="currentSlide(3)"></span>
  </div>
</div>
The defined structure of elements is then styled according to the developer needs. In the case of the Farnese Castle, the appeareance has been defined in the assets/css/style.css file:
/* Slideshow container */
.slideshow-container {
  max-width: 1000px;
  position: relative;
  margin: auto;
}
/* Next & previous buttons */
.prev, .next, .closing {
  cursor: pointer;
  position: absolute;
  top: 50%;
  width: auto;
  padding: 16px;
  margin-top: -22px;
  color: white;
  font-weight: bold;
  font-size: 18px;
  transition: 0.6s ease;
  border-radius: 0 3px 3px 0;
  user-select: none;
}
/* Position the "next button" to the right */
.next {
  right: 0;
  border-radius: 3px 0 0 3px;
}
/* Position the "next button" to the right */
.closing {
  top: 0;
  right: 0;
  border-radius: 3px 0 0 3px;
}
/* On hover, add a black background color with a little bit see-through */
.prev:hover, .next:hover {
  background-color: rgba(0,0,0,0.8);
}
/* Caption text */
.photo-slide {
  text-align: center;
}
/* Caption text */
.text {
  color: #f2f2f2;
  font-size: 15px;
  padding: 8px 12px;
  position: absolute;
  bottom: 8px;
  width: 100%;
  text-align: center;
}
/* Number text (1/3 etc) */
.numbertext {
  color: #f2f2f2;
  font-size: 12px;
  padding: 8px 12px;
  position: absolute;
  top: 0;
}
/* The dots/bullets/indicators */
.dot {
  cursor: pointer;
  height: 15px;
  width: 15px;
  margin: 0 2px;
  background-color: #bbb;
  border-radius: 50%;
  display: inline-block;
  transition: background-color 0.6s ease;
}
.active, .dot:hover {
  background-color: #717171;
}
/* Fading animation */
.fade {
  animation-name: fade;
  animation-duration: 1.5s;
}
@keyframes fade {
  from {opacity: .4}
  to {opacity: 1}
}
/* On smaller screens, decrease text size */
@media only screen and (max-width: 300px) {
  .prev, .next,.text {font-size: 11px}
}
#split-container {
  height: 100%;
  float: left;
}
Later in the index.html code the .closeSlides() is defined as follow:
function closeSlides() {
  $("#anno10").fadeOut();
  //reset opacity of parent page
  parentWin = window.parent;
  var sidebar = parentWin.document.getElementById('split-container');
  sidebar.style.opacity = "1";
}
The .showSlides() function is instead defined by first associating each div element of interest to dedicated variable. Then, through the slide index is used to call the desired image panel within a list of specific class element.
function showSlides(n) {
  let i;
  let slides = document.getElementsByClassName("mySlides");
  let dots = document.getElementsByClassName("dot");
  if (n > slides.length) { slideIndex = 1 }
  if (n < 1) { slideIndex = slides.length }
  for (i = 0; i < slides.length; i++) {
    slides[i].style.display = "none";
  }
  for (i = 0; i < dots.length; i++) {
    dots[i].className = dots[i].className.replace(" active", "");
  }
  slides[slideIndex - 1].style.display = "block";
  dots[slideIndex - 1].className += " active";
}
Then, .plusSlides() and .currentSlide() are defined as needed according to their linked button:
function plusSlides(n) {
  showSlides(slideIndex += n);
}

function currentSlide(n) {
  showSlides(slideIndex = n);
}
Indoor navigation
The exploration of the 3D reconstruction of the indoor portion of Bastione San Giacomo was defined through a series of actions included into annotations.
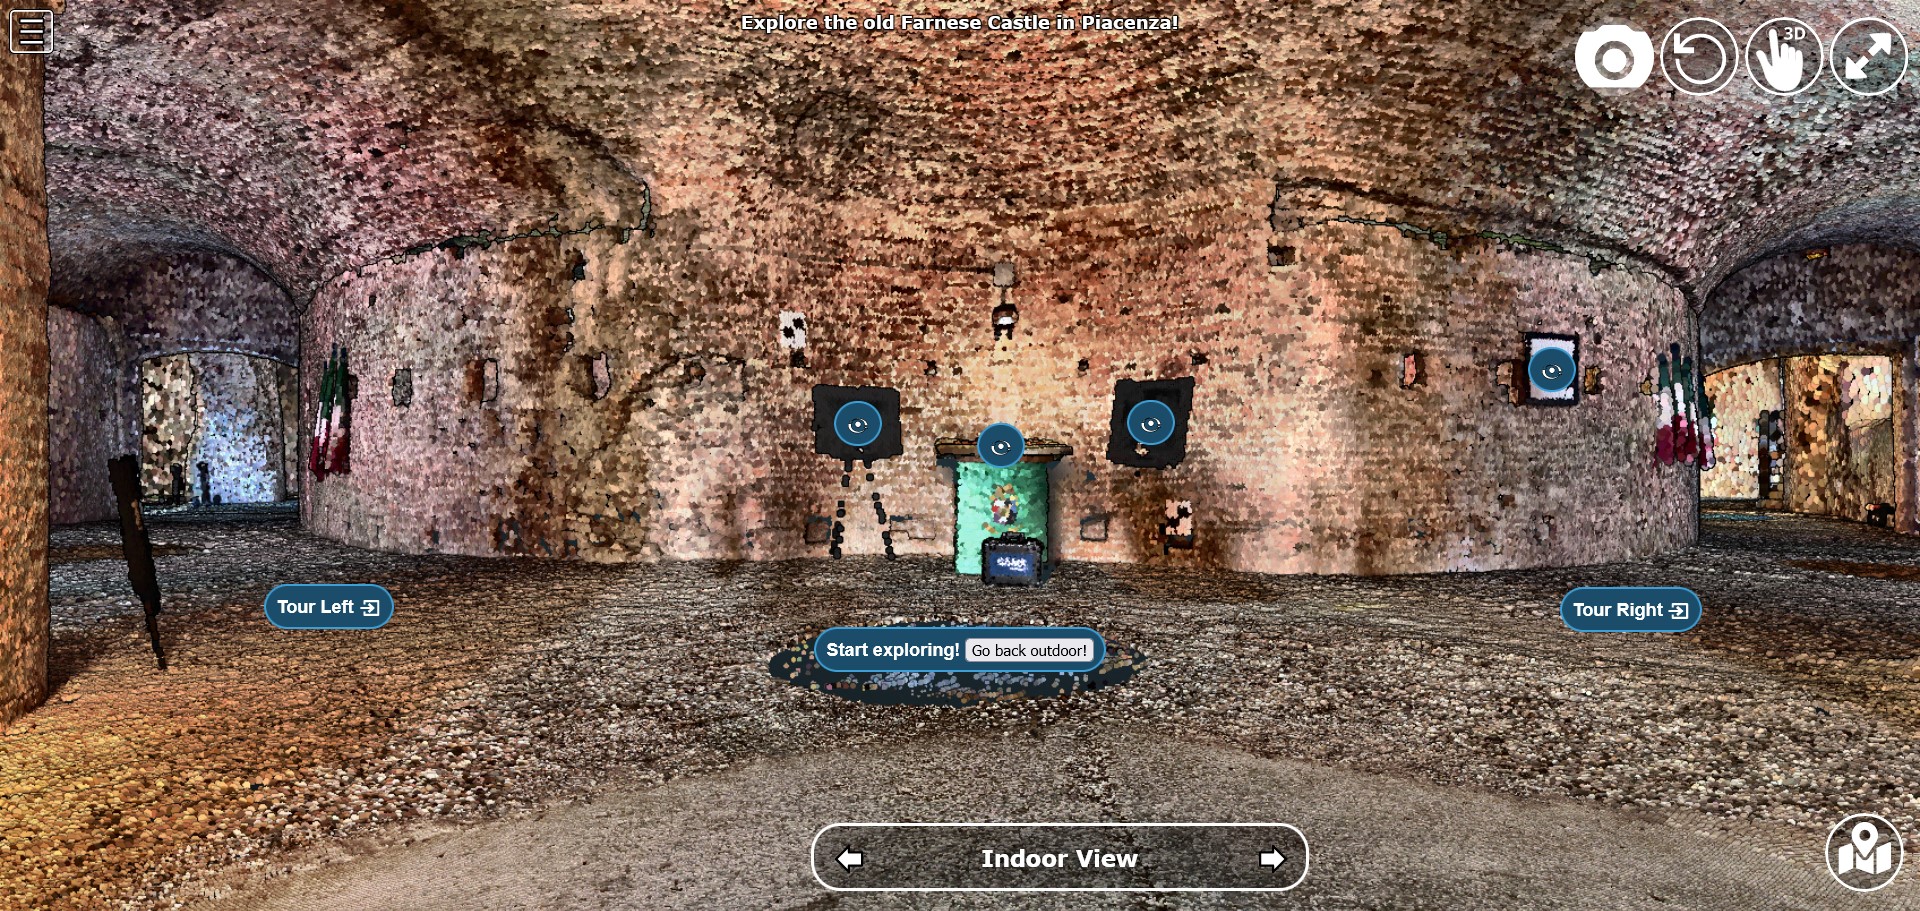
In particular, the following actions were implemented:
Changing view and scene;
Showing image pop-up;
Playing animations.
Changing view and scene
This action is implemented in the Start exploring! annotation located in the center of the entrance. Its goal is to trigger the movement from the indoor environment to the outdoor scene.
In order to do so, an input button element is defined in the annotation name. Then, the action is defined by defining the series of operations to be executed when the button whose name is “outdoor” is clicked by the user.

This event will first call the function changeHotspotName(), changing the hotspot name to the one of the reference point of interest on which the new scene will be focused. In this case, it will be the outdoor of the San Giacomo bastion. So, the name to be included within the brackets is “San Giacomo”.
Hence, the moveHere() method of the Annotation class is applied to the third element ([2]) of the annotation list defined in the loadannotations.js file. In this case, it was needed to switch to the camera view defined in the Bastione San Giacomo annotation that was defined as the third in the js file. By applying this method, the new view will automatically be set considering the coordinates and orientations included in the referred annotation.
Eventually, the visibility of annotations is changed according to the new view. Consequently, the visible property of all the annotation children defined inside the bastion is set to false, while the one of the new outdoor scene annotations is changed to true.
  ...
{
  // Indoor
  let Titolo4 = $('<span>Start exploring! <input type="button" name="outdoor" value="Go back outdoor!"/></span > ')
  Titolo4.find("input[name=outdoor]").click((event) => {
      event.stopPropagation();
      changeHotspotName("San Giacomo");
      scenears.annotations.children[2].moveHere(scenears.camera);
      scenears.annotations.children[0].visible = true;
      scenears.annotations.children[1].visible = true;
      scenears.annotations.children[2].visible = true;
      scenears.annotations.children[3].visible = false;
      scenears.annotations.children[4].visible = false;
      scenears.annotations.children[5].visible = false;
      scenears.annotations.children[6].visible = false;
      scenears.annotations.children[7].visible = false;
      scenears.annotations.children[8].visible = false;
      scenears.annotations.children[9].visible = false;
      scenears.annotations.children[10].visible = false;
      scenears.annotations.children[11].visible = false;
      scenears.annotations.children[12].visible = false;
      scenears.annotations.children[13].visible = false;
      scenears.annotations.children[14].visible = false;
      scenears.annotations.children[15].visible = false;
      scenears.annotations.children[16].visible = false;
  });
  Titolo4.toString = () => "Start exploring!";
  let nota4 = new Potree.Annotation({
      position: [553471.056, 4988913.293, 95.054],
      title: Titolo4,
      cameraPosition: [553474.7425516201, 4988912.090928567, 96],
      cameraTarget: [553471.056, 4988913.293, 96],
      description: '<b>Welcome to the indoor portion of the San Giacomo rampart!</b><br>----<br>This space is the site of a permanent exhibition of historic cartography and documents about the evolution of the city of Piacenza.<br>You can start exploring the two wings of this space by clicking on the <i>"Tour Right"</i> and <i>"Tour Left"</i> annotations.<br>The indoor point cloud has been completely acquired through TLS scans with a CAM2 Focus M70.'
  })
  nota4.visible = false;
  scenears.annotations.add(nota4);

}
…
Showing image pop-up
The orbit icon included in the indoor annotations is associated to an image detail. Indeed, after clicking on it, the platform shows a pop up with the image attached to the annotation of interest. To return to the navigation scene, the user could simply click on the faded area outside the shown image.
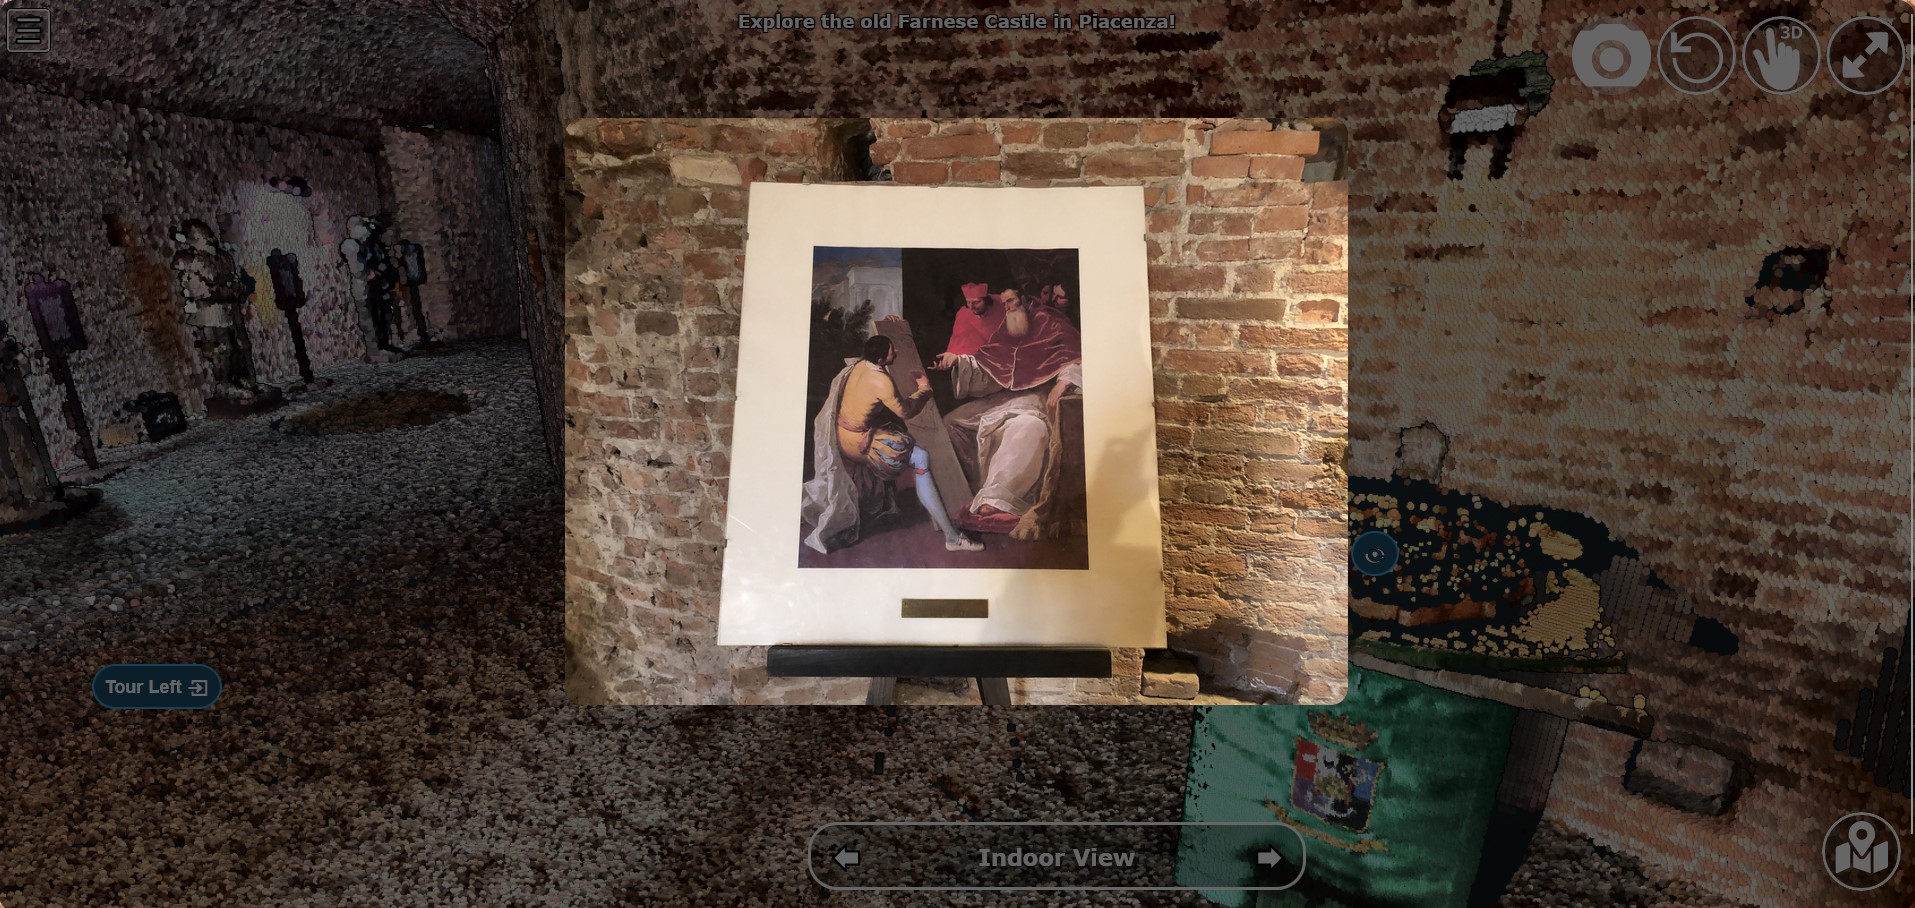
This action is firstly prepared by definind a div element in the index.html page: it will be the panel that will appear in the middle of the screen when the annotation is clicked. Inside it, an images tag is defined with the link to the source file path of the image that will be included in the panel when visible.
<!--Paolo III print-->
      <div id="anno8" class="navPanel w3-center w3-animate-opacity">
          <div class="navPanel-content">
              <div class="intrinsic-container intrinsic-container-16x9">
                  <img class="anno_img" src="./assets/anno-img/paoloIII.jpg" />
              </div>
          </div>
      </div>
The style for the panel - with rounded corner and position settings - is instead defined in the assets/css/style.css file.
.navPanel-content {
  margin: auto;
  padding: 20px;
  width: 80%;
  border-radius: 20px;
  position: absolute;
  left: 9%;
  text-align: center;
}
Finally, the annotation is defined with its title and action. The latter one is implemented by including the orbit control icon in the annotation title: this img tag will be the one looked for by the find() method in the next line. In this way, the click event will first set the camera view in correspondence of the annotation clicked. Then, the div #anno8 previously defined is retrieved and the .fadeIn() method is applied to it. In this way, the panel will gradually appear in the middle of the screen and the Potree scene below will appear more opaque. Similarly, a new click event on the window will trigger the .fadeOut() method applied to the same div element. Finally, the annotation panel will disappear and the view will return to the previous Potree scene.
  {
      // Paolo III print
      let Titolo16 = $(`
          <span>
              <img src="./libs/potree/resources/icons/orbit_controls.svg" name="anno_panel8" class="annotation-action-icon" "/>
          </span>
      `);
      const elAnno10 = Titolo16.find("img[name=anno_panel8]");
      elAnno10.click(() => {
          scenears.annotations.children[15].moveHere(scenears.camera);
          $("#anno8").fadeIn();
          parentWin = window.parent;
          var sidebar = parentWin.document.getElementById('split-container');
          sidebar.style.opacity = "0.2";
      });
      var annoPanel8 = document.getElementById('anno8');
      annoPanel8.addEventListener('click', function () {
          $("#anno8").fadeOut();
          //reset opacity of parent page
          parentWin = window.parent;
          var sidebar = parentWin.document.getElementById('split-container');
          sidebar.style.opacity = "1";
      });
      Titolo16.toString = () => "Paolo II print";
      let nota16 = new Potree.Annotation({
          position: [553468.173, 4988913.334, 96.274],
          title: Titolo16,
          cameraPosition: [553470.5484979739,4988913.944287285,97.04518532773058],
          cameraTarget: [553468.173, 4988913.334, 96.274],
          description: '<b>Paolo II print</b><br>----<br>The Pope is shown seated and flanked by Cardinal Alessandro Farnese as he approves the plan of the castle of Piacenza. The plan is presented to him by Pierluigi, who is kneeling, and is dressed in yellow and blue and has a white mantle. Architecture can be glimpsed in the background.<br>Original paint from 1685 - 1687 by Sebastiano Ricci, preserved at the Civic Museum of the Farnese Palace (Piacenza).<br>----<br><img src="assets/anno-img/paoloIII.jpg" alt="Paolo III Print" title="Paolo III Print" width="270px">'
      })
      nota16.visible = false;
      scenears.annotations.add(nota16);
  }

...
Playing animations
In the indoor exploration, 2 animations are implemented for navigating the right and left wing of the reconstructed model. This type of action could be helpful for defining a pre-fixed user exploration path and consequently changing the visibility of some particular annotations depending on exploration positions.
First, the definition of the animation is set in assets/js/loadanimations.js. This is done by initially creating the animation object, then defining the camera and targets positions. An easy way to achieve so is to navigate the model and, one the desired view for a camera animation node is found, export the Potree scene information by clicking on the sidebar Scene>Export: Potree. In the downloaded potree.json file, it will be possible to copy the coordinates of the camera and target position of that specific view. Then, those values can be pasted respectively in the position and target lists as shown in the script example below. By defining multiple camera and target positions as explained before, it will be possible to create an equal amount of view point that will be interpolated when the animation play action is triggered. This type of process is explained in the code through a for loop that creates as many animation nodes (control points) as there are camera and target positions defined.
After that, the animation is added as an object of the scene through the .addCameraAnimation() method and its visibility is set to false so that the associated colored trajectory line remains hidden.
const animation2 = new Potree.CameraAnimation(viewer);
const positions2 = [
  [553471.5649587561, 4988912.824383096, 96.74929992934102],
  [553470.8266211117, 4988920.956978676, 96.96684674759675],
  [553468.970057797, 4988925.671973037, 96.93937869520164],
  [553466.3895679122, 4988928.694618191, 96.67629091896133],
  [553464.5111995947, 4988930.979751398, 96.70556033095784]
];

const targets2 = [
  [553470.899, 4988918.329, 95.915],
  [553470.7600219863, 4988921.507467228, 96.832169690892],
  [553468.7403491414, 4988926.177655794, 96.80849752652905],
  [553465.620604052, 4988930.300358385, 96.4827080923057],
  [553464.0111806979, 4988932.023884267, 96.57968306104952]
];

for (let i = 0; i < positions2.length; i++) {
  const cp = animation2.createControlPoint();

  cp.position.set(...positions2[i]);
  cp.target.set(...targets2[i]);
}

scenears.addCameraAnimation(animation2);
animation2.visible = false;
Once the animation is defined, it’s time to set how it should be triggered through a click event on the Potree scene. This again results in the use of an icon and of the find() method. When the icon is clicked, the animation is then activated thorugh the line animation2.play(). In the same code block, the visibility of the desired annotation is changed according to the developer needs.
{
  // Tour Right
  let Titolo6 = $(`
              <span>
                  Tour Right
                  <img src="./libs/potree/resources/icons/goto.svg" name="action_set_animation2" class="annotation-action-icon" style="filter: invert(1);"/>

                  </span>
              `);
  const elPlay2 = Titolo6.find("img[name=action_set_animation2]");
  elPlay2.click(() => {
      animation2.play();
      scenears.annotations.children[12].visible = true;
      scenears.annotations.children[14].visible = true;
  });
  Titolo6.toString = () => "Tour Right";
  let nota6 = new Potree.Annotation({
      position: [553470.899, 4988918.329, 94.915],
      title: Titolo6,
      cameraPosition: [553471.5649587561, 4988912.824383096, 96.74929992934102],
      cameraTarget: [553470.899, 4988918.329, 95.915],
      description: 'Click on the icon and walk through the indoor left wing of the bastion...<br>----<br>You may discover a <b>secret passage</b>!'
  })
  nota6.visible = false;
  scenears.annotations.add(nota6);
}
Note
Another useful tip to facilitate user pre-fixed movements and explorations with the model scene is to position an annotation at the end of the animation path that includes an action allowing to return to the initial scene view, as the example view.